What Next?
So far, we’ve introduced some basic coding and game design concepts and written some helper functions that will live up to their name soon enough. Let’s take a step back and think about what kind of game we’re making, as this will help guide us over the next few parts of this tutorial.
Tower Defense
Player controls
Typically, the player in tower defense games acts as a godlike presence, building and upgrading towers from nowhere as the player issues actions using their mouse or a touchscreen. However, this is a Pico-8 game, and Pico-8 games usually mimic an oldschool console with two-button control schemes using either a gamepad or joystick or the keyboard. While we could implement a cursor controlled by a gamepad, I don’t think it’d be very fun here. So, unlike traditional tower defense games, I’ve decided to use an actual player character to control and build the towers. This can be seen in games like Factorio, which features base-building with a player character instead of the traditional god-game approach, and also has tower defense gameplay among many many other things!
Setting and gameplay
Instead of building using traditional towers like turrets, cannons and laser towers, I’ve decided to use totems which I think will add a nice twist to both the gameplay and graphics. To further differentiate from a plain tower defense game, I’ve made several other design decisions: - There will be no currency; totems will be summoned using mana - Totems disappear after a certain duration and must be re-summoned - Loot can be collected from enemies to enhance the player and totems - Certain loot persists between runs to make subsequent runs less difficult - Enemies don’t follow a fixed path but have dynamic pathing based on the presence of totems and other terrain obstacles
Some other things will be familiar to the TD genre: - The player defends a fixed base or bases - Enemies attack in waves
- Once the base is destroyed or the player dies, the game is over
Creating a Prototype
I think the above is enough to get started with, and it sounds to me like it’ll make a fun game, but I don’t really know because I haven’t made it yet myself! After making a few games already, I think it’s important to focus on geting the basic gameplay loop down as early as possible, so that every run of the game is a playtest, and you can get feedback on your game as early as possible.
So with that in mind, let’s now focus on what we want in our core gameplay loop:
- A player that can move around
- Ability to place totems
- Enemies that spawn in waves
- Totems attack enemies
- Enemies attack our base
- Once the wave has been defeated, spawn a new wave
- When there are no waves left, the game is complete
This might already seem like a lot, but I think it’s the minimum things we need to have satisfying gameplay in our game. There’s a lot of things left out such as variety of totems, mana management, different enemies, boss levels, loot and upgrades and much more. These are the things that will add depth to our game after the basic gameplay loop is finished.
Player movement
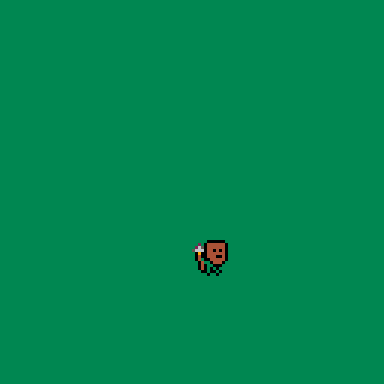
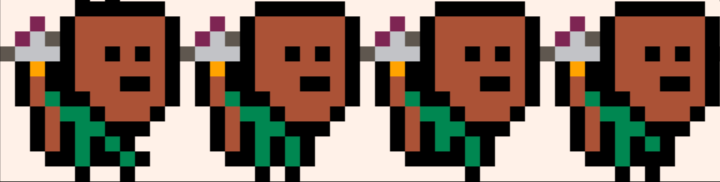
Let’s get started with a goal in mind: we want a player character that can respond to player input and move around on the screen, along with animation. This will help us get a general feel for the game’s atmosphere and playstyle. I want to start by drawing a basic walking animation in the sprite editor.
If you’ve never done pixel art before, don’t worry, just use this as practise. In Pico-8 the sprites are usually very small and it’s not possible to add too much detail, so the gameplay ends up being more important. But interesting sprites can really make a game stand out. Some tutorials I found very useful are Derek Yu’s (creator of Spelunky) and Pedro Medeiros (Saint11)’s (artist for Celeste).
For a walking animation, we just want to show some movement of each leg, and ensure that the final frame loops back to the first. I came up with the 4 frames below; feel free to copy this but I’d encourage you to draw your own.
This should do for now. Let’s work on getting it drawn on the screen.
Revisiting make
Remember that our make function is supposed to help us write reusable code. How does it do that? Well, we’ve already seen how drawspr can be used to draw anything as long as it has certain properties like x and y. (By the way, this concept is known as polymorphism in object-oriented programming). But what if we try to draw something that doesn’t have those properties? Then we’ll get an error - and in general, whenever we try to use a function on something that doesn’t have a propery that we expect it to, our program will crash. This is where make comes in. We can tell make to create a table with some default properties that we expect all entities in our game to have. So far it only has x and y, but we’ll need a few more than that. Replace make with the following code to introduce some more default properties.
|
|
Here:
- the
spr*properties are used bysspr()to locate the correct sprite on the spritesheet dwanddhare used to scale the sprite, not used at the momentxandyare the coordinates of the entityflipxandflipyare used to flip the spritesx,syandspdwill be used later to calculate movement
I’ve also added an optional extra parameter. This allows us to call make with some additional properties which will then get added to the returned table.
makeplayer
So now we have our player’s sprites, a ready to use make function, but our player doesn’t really exist in a way that can be used with drawspr() yet. To fix that, let’s write a makeplayer function.
|
|
Be sure to change sprx and spry to the top-left pixel of your sprite animation if it’s different to 0,0, and make sure sprw and sprh reflect your sprite’s width and height.
The animate function we wrote assumes that all animation frames are on the same row (have the same y value). The anim property should be set to the x coordinate of each frame. For example, if the sprite’s width is 12 and starts at 0,0, then anim will be in multiples of 12 like above.
Now let’s use make_player() in our init_globals function, replacing player_x and player_y:
|
|
Drawing the player
Now we’ve created our player and assigned it to the global variable p, so we can easily draw it on the screen!
Replace the _draw function with this:
|
|
While we’re here, I’ve added a command to print the _debug message to the screen as I mentioned previously.
palt is a useful function that changes the transparency of a given colour. By default, black is transparent, but I want to make use of black pixels in the actual sprite. So for now I’ve told Pico-8 to use as the transparent colour and black as a regular colour. This means in our sprite, the white background won’t get drawn on the screen.
Run the program and you should notice an error:
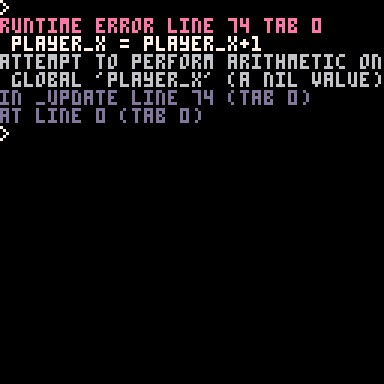
That’s because our _update function still uses player_x and player_y, which no longer exist. Don’t worry about fixing it, because we’re going to rewrite our player movement now anyway.
Making the player move
There are three things we need for the player to move properly:
- Respond to player input
- Move the player by adjusting
xandy - Animate the player, accounting for change in direction.
These will go in our _update function, so let’s do one thing at a time. Replace the existing _update function (we’ll increment t while we’re here):
|
|
This simply calls a new function movement() which we haven’t written yet. The _update function in Pico-8 can get very large, so it’s worth splitting it up into smaller functions whenever you can.
Player input
|
|
Player input in Pico-8 is detected by the btn and btnp functions. btn is used when the button is meant to be held down, like movement or firing, while btnp is meant for one-off presses like jumping and menu interactions. The numbers 0-5 correspond to different input buttons - refer to the cheat sheet if you can’t remember them.
Oh look! We’ve encountered another new programming concept here, the conditional control flow statement if..then..elseif..then..end. This alters the program behaviour depending on certain conditions, in this case whether or not a button is being pressed. p.sx and p.sy represent the player’s current speed, and we’ll set them both to 0 to begin with. mspd is a fixed value that we’ll use for the player speed, which makes it handy to adjust later. Note that p.sx and p.sy can both be adjusted at the same time - a player can move up and left at the same time, but not left and right at the same time, for example.
Adjusting x and y
Once we have the speed calculated, we can adjust the player’s coordinates. The reason we do this in two stages is because many things can affect the player’s current speed, such as gravity, terrain, traps, being pushed by an NPC and so on. So adjusting x and y should be one of the last things we do in the update function.
Add this to the movement function, before the final end:
|
|
Animation
Now our player can move, but it’s always facing the same direction and looks a bit strange without animation. So let’s fix that.
At the end of the movement function, we can set flipx depending on whether the player is moving left or right:
|
|
Note that for simple conditions, we can put the if.. then.. end on a single line. Note also that we need two separate conditions here. If we had done something like p.flipx=(p.sx < 0) then the player would always flip back to facing right whenever we stopped moving.
When you run the program, notice how the flip already works without us having to change the call to sspr at all. This is because our drawspr function is already doing it based on the flipx property. cool!
Similarly, we only need to add a few lines to our update function to make the animation work. We only want the animation to happen when the player is moving, not standing still, so we check that the player has some x or y speed before doing the animation:
|
|
Here, ~= is a boolean operator that means ’not equals’. Other examples of boolean operators that we’ve already seen are > and < for greater/less than, == for equals, >= for ‘greater than or equals to’ and so on.
Next steps
After part 4 of our tutorial, we’re starting to see our game come to life - the animations really help here. Next we’ll work on developing our prototype further, and allow the player to place totems which will be the towers in our tower defense game.